

In our very first code-along, you built a simple app with a slider that controlled the size of a circle. Along the way, you learned one of SwiftUI’s most important concepts: binding state to the user interface.
Now, we’ll take this same app one step further — and introduce a technique used in real apps that display sensitive information:
Sometimes, you may want to prevent your app’s content from appearing in screenshots or screen recordings. This can be useful for protecting private data, confidential information, or simply giving users more control over how content is shared.
Apple does not provide a dedicated public API in SwiftUI or UIKit specifically designed to block screenshots of arbitrary views. However, iOS does include a secure rendering mechanism used for password fields. When a view is marked as secure, the system treats its content differently and prevents it from appearing in screenshots and screen recordings.
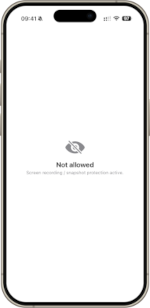
In this code-along, you’ll learn how to use this secure rendering mechanism and apply it to your own SwiftUI views so that when attempting a screenshot, you’ll get this:
Step 0: Set up your project
We begin with your original view: a circle whose size is controlled by a Slider. You can find the respective project on Github: https://github.com/swiftandcurious/SliderControl
This is your starting code:
import SwiftUI

struct ContentView: View {
    @State private var circleSize: CGFloat = 50

    var body: some View {
        VStack {
            Text("Slider Control")
                .font(.title.bold())

            Circle()
                .fill(Color.orange)
                .frame(width: circleSize, height: circleSize)
                .frame(width: 220, height: 220)
                .padding()

            Text("Adjust the size of the circle:")

            Slider(value: $circleSize, in: 5...200)
                .tint(.orange)
                .padding()

            Spacer()
        }
    }
}
Step 1: Add a toggle to enable/disable protection
Add a new @State variable isProtected and a Toggle so the user can turn screenshot protection on and off. In the property section:
@State private var isProtected: Bool = false
And below the Slider:
Toggle("Screenshot protected", isOn: $isProtected)
	.padding(15)
Now we have a switch — but it doesn’t do anything yet.
Step 2: Add a conditional modifier
SwiftUI doesn’t have a built-in .if(condition) modifier, so we’ll add a tiny helper extension that lets us apply modifiers only when needed.
Add this once (anywhere in your project):
extension View {
    @ViewBuilder
    func `if`<Transformed: View>(
        _ condition: Bool,
        transform: (Self) -> Transformed
    ) -> some View {
        if condition {
            transform(self)
        } else {
            self
        }
    }
}
Now we can say: “only when isProtected is true, apply a mask”.
Step 3: The key trick: use a “secure” UIKit view as a screenshot mask
Here’s the idea:
- A UITextField with isSecureTextEntry = true tells iOS: this is sensitive content
- iOS then treats that render layer specially and often hides it in screenshots and screen recordings
- We don’t want an actual text field on screen — we just want the “secure rendering” behavior. So we embed it invisibly using UIViewRepresentable and use it as a mask.
Create a new struct ScrenshotMask – the “engine” behind our screenshot protection. Even though we’re building a SwiftUI app, we intentionally dip into UIKit here — because UIKit has a secure rendering feature that SwiftUI doesn’t expose directly:
struct ScreenshotMask: UIViewRepresentable {

}
Why UIViewRepresentable?
SwiftUI and UIKit are different UI frameworks. UIViewRepresentable is SwiftUI’s bridge that lets us wrap a UIKit view (here: UITextField) so we can use it inside SwiftUI.
In other words: we’re embedding a UIKit view into our SwiftUI hierarchy.
When you use UIViewRepresentable, SwiftUI needs two things:
- A way to create the UIKit view
- A way to update the UIKit view when SwiftUI state changes
That’s why the protocol requires two functions:
func makeUIView(context: Context) -> UIView
func updateUIView(_ uiView: UIView, context: Context)
with
makeUIView: called once, when the view is first createdupdateUIView: called whenever SwiftUI needs to update the view
Let’s start with the makeUIView that protects our content:
func makeUIView(context: Context) -> UIView {
    let view = UITextField()
    view.isSecureTextEntry = true
    view.text = ""
    view.isUserInteractionEnabled = false

    return view
We are using a UITextField because it has a special feature: when you set isSecureTextEntry = true, iOS treats it like a password field. That means the system renders it using a secure drawing path. In many cases, iOS will exclude secure content from screenshots and screen recordings.
We’re not using it for text input. We only want the secure rendering behavior.
So we set:
view.text= “”: no actual contentview.isUserInteractionEnabled = false: it doesn’t steal taps or focus
Think of it as an invisible “secure shield” rather than a real UI element.
Next we need to find the secure rendering layer and therefore please add inside the makeUIView before return view:
if let secureLayer = findSecureLayer(in: view) {
    secureLayer.backgroundColor = UIColor.white.cgColor
} else {
    view.layer.sublayers?.last?.backgroundColor = UIColor.white.cgColor
}
UIKit views are built from multiple Core Animation layers (CALayer). One of these layers is responsible for the secure rendering behavior.
The function findSecureLayer(in:) searches for that layer – we will define it in a second.
If we find it, we set its background color. This helps ensure the masking behaves reliably and avoids transparency issues.
If we cannot find it, we fall back to using the last available sublayer, which works well in practice.
Let’s now define our findSecureLayer function:
private func findSecureLayer(in view: UIView) -> CALayer? {
    view.layer.sublayers?.first(where: { layer in
        layer.delegate.debugDescription.contains("UITextLayoutCanvasView")
    })
}
This function inspects the internal layers of the UITextField.
Each layer has a delegate responsible for drawing its content. The secure text rendering layer typically contains “UITextLayoutCanvasView” in its debug description.
We use this as a reliable indicator to identify the secure layer.
Once found, we return it so we can configure it.
Finally, we need to include a function updateUIView in our ScreenshotMask – as mentioned before it is required due to the UIViewRepresentable:
func updateUIView(_ uiView: UIView, context: Context) { }
}
This function is empty because our ScreenshotMask never changes after it is created. Nevertheless, we do need this function as it is required by the UIViewRepresentable protocol.
With that, we have created our ScreenshotMask. When SwiftUI applies this view as a mask:
.mask {
    ScreenshotMask()
}
it uses the secure UIKit layer for rendering.
Because this layer is marked as secure (isSecureTextEntry = true), iOS excludes the protected content from screenshots and screen recordings.
The user still sees the real content on screen — but the system hides it when capturing the display.
Step 4: Apply the mask only when protection is enabled
Now we combine everything:
- If
isProtected == true: we apply theScreenshotMask() - If
isProtected == false: app behaves normally
This keeps the logic clean and avoids unnecessary overhead when protection isn’t needed.
This we apply as a modifier in our ContentView:
.padding()
.frame(maxWidth: .infinity, maxHeight: .infinity)
.background(Color(uiColor: .systemBackground))
.if(isProtected) { view in
view
.mask {
ScreenshotMask()
.ignoresSafeArea()
}
.background {
ContentUnavailableView(
"Not allowed",
systemImage: "eye.slash.fill",
description: Text("Screen recording / snapshot protection active.")
)
}
}
We apply the secure mask to protect the content by
.mask {
ScreenshotMask()
.ignoresSafeArea()
}
This is the core of the protection mechanism.
The .mask modifier defines which parts of the view are visible. Here, we use our custom ScreenshotMask we created earlier, which internally contains a UIKit view with:
isSecureTextEntry = true
This tells iOS to treat the rendered content as secure, just like a password field.
As a result:
- The content remains fully visible to the user.
- But when iOS creates a screenshot or screen recording, the protected content is automatically hidden.
The .ignoresSafeArea() ensures the protection covers the entire screen.
By adding the .background modifier to the view
.background {
ContentUnavailableView(
"Not allowed",
systemImage: "eye.slash.fill",
description: Text("Screen recording / snapshot protection active.")
)
}
we create a fallback view behind the protected content.
Normally, this background is completely covered by the real UI and is not visible.
However, during a screenshot, iOS hides the secure content. When that happens, the background becomes visible instead. This allows us to show a clear message like: “Not allowed. Screen recording / snapshot protection active.”
Important note: The order of the modifiers is important
The order of .mask and .background is crucial.
SwiftUI applies modifiers in sequence, creating a layered view hierarchy.
In our case, the order is:
- Start with the original view
- Apply the secure
.maskto protect the content - Add the
.backgroundbehind the protected content
This means:
- The mask applies only to the original content
- The background remains separate from the masked content
This is exactly what we want.
If the order were reversed, like this:
view
.background { ContentUnavailableView(...) }
.mask {
    ScreenshotMask()
}
then the mask would apply to both the content and the background — and everything would be hidden in screenshots, resulting in a blank image.
By applying the mask first and the background afterwards, we ensure that:
- the real content is protected
- and the fallback remains visible
And with that, we have already successfully implemented our UI protection — very well done! 🎉
What you have learnt
You’ll learn how to:
- conditionally modify your view using SwiftUI
- bridge SwiftUI and UIKit using UIViewRepresentable
- use secure rendering to protect sensitive UI content
That’s a wrap!
Keep learning, keep building, and let your curiosity guide you.
Happy coding! ✨
Attitude is a little thing that makes a big difference. – Winston Churchill
Download the full project on GitHub: https://github.com/swiftandcurious/NoScreenshotSliderControl