

In this month’s code-along, we’ll create MemorizeMe — a voice-powered learning app that helps you memorize poems, lyrics, speeches, or anything you want to learn by heart.
What you’ll build
- A two-tab SwiftUI app with an Edit view (to enter or change the poem) and a Practice view (to recite it from memory)
- Real-time speech-to-text transcription using Apple’s advanced Speech framework
- A custom scoring algorithm that compares the spoken text to the original poem word by word
- A polished UI that shows your recognized text and a match score instantly
- User-editable poems, including an optional “Reset to Default” button
By the end, you’ll have a fully functional “recite and score” app — simple, accurate, and surprisingly fun to use for learning and memorizing.
You can try it with the default example (“Jingle Bells”) or paste in your own favorite poem or speech.
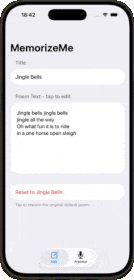
The app will look like this:
Step 0: Set up your project
- Open Xcode: Launch Xcode and select Create a new Xcode project.
- Choose Template: Select App under the iOS tab and click Next.
- Name Your Project: Enter a name for your project, like
MemorizeMe.- interface: SwiftUI
- language: Swift
Click Next, and then save your project.
When you open your project, you’ll see the already familiar standard code presenting a globe and the Text “Hello, world!” in the ContentView.swift.
Add to Info.plist (for saving to Photos via Share sheet):
NSSpeechRecognitionUsageDescription → “MemorizeMe uses speech recognition to compare your recitation to the original text.”NSMicrophoneUsageDescription → “MemorizeMe needs microphone access to listen to your recitation.”
Step 1: Define the MemorizeViewModel
import Foundation
import Combine

final class MemorizeViewModel: ObservableObject {
    @Published var poemTitle: String = "Jingle Bells"
    @Published var poemText: String = """
Jingle bells jingle bells
jingle all the way
Oh what fun it is to ride
in a one horse open sleigh
"""

    // Will hold the recognized speech text
    @Published var recognizedText: String = ""

    // Score (0…1)
    @Published var matchScore: Double? = nil

    // Simple helper to reset score
    func resetPractice() {
        matchScore = nil
    }
}
Add this viewModel to your MemorizeMeApp.app:
Define a variable for the viewModel
@StateObject private var viewModel = MemorizeViewModel()
Inject it into ContentView:
ContentView()
	.environmentObject(viewModel)
Step 2: Build the Basic UI (Edit + Practice)
In this step we will just create the UI. We will add the functionality in a moment.
Create a view PoemViewwhere you can display and edit the poem:
import SwiftUI

struct EditPoemView: View {
    @EnvironmentObject var viewModel: MemorizeViewModel

    var body: some View {
        NavigationStack {
            Form {
                Section("Title") {
                    TextField("Poem title", text: $viewModel.poemTitle)
                }

                Section("Poem Text") {
                    TTextEditor(text: $viewModel.poemText)
                        .frame(minHeight: 200)
                        .font(.system(.body, design: .rounded))
                        .toolbar {
                            ToolbarItemGroup(placement: .keyboard) {
                                Spacer()
                                Button("Done") {
                                    hideKeyboard()
                                }
                            }
                        }
                }
            }
            .navigationTitle("MemorizeMe")
        }
    }
}

extension View {

    func hideKeyboard() {
        UIApplication.shared.sendAction(#selector(UIResponder.resignFirstResponder), to: nil, from: nil, for: nil)
    }
}
Please create a new SwiftUI file PracticeViewthat holds the UI where the recording will be done and a score for the match will be shown:
import SwiftUI

struct PracticeView: View {
    @EnvironmentObject var viewModel: MemorizeViewModel

    var body: some View {
        NavigationStack {
            VStack(spacing: 24) {
                Text(viewModel.poemTitle)
                    .font(.title)
                    .bold()
                    .multilineTextAlignment(.center)

                Text("Poem text is hidden. Recite it from memory!")
                    .font(.subheadline)
                    .foregroundStyle(.secondary)
                    .multilineTextAlignment(.center)
                    .padding(.horizontal)

                // Placeholder controls – we'll wire these up to Speech later
                HStack(spacing: 20) {
                    Button("Start Listening") {
	                    viewModel.resetPractice()
                        // speech will start here later
                    }
                    .buttonStyle(.borderedProminent)

                    Button("Stop & Score") {
                        // to be implemented
                    }
                    .buttonStyle(.bordered)
                }

                if let score = viewModel.matchScore {
                    VStack(spacing: 4) {
                        Text("Match Score")
                            .font(.headline)
                        Text("\(Int(score * 100))%")
                            .font(.system(size: 32, weight: .bold, design: .rounded))
                    }
                    .padding()
                    .background(.thinMaterial)
                    .clipShape(RoundedRectangle(cornerRadius: 16))
                } else {
                    Text("No score yet – recite and tap “Stop & Score”.")
                        .font(.footnote)
                        .foregroundStyle(.secondary)
                }

                Spacer()
            }
            .padding()
            .navigationTitle("Practice")
        }
    }
}
Include both views into the ContentView:
import SwiftUI

struct ContentView: View {
    @EnvironmentObject var viewModel: MemorizeViewModel

    var body: some View {
        TabView {
            EditPoemView()
                .tabItem {
                    Label("Edit", systemImage: "square.and.pencil")
                }

            PracticeView()
                .tabItem {
                    Label("Practice", systemImage: "mic")
                }
        }
    }
}
At this point, you can already run the app and switch between Edit and Practice. No speech or scoring yet, just layout.
Step 3: Add a simple scoring functionality
Before we add speech, let’s define how we’ll score the match:
- Normalize both texts (lowercase, remove punctuation)
- Split into words
- Score = (number of matching words in order) / (number of words in poem)
We will create an extension to our MemorizeViewModel:
extension MemorizeViewModel {

}
In this extension let’s first define a function to normalise the text:
func normalize(text: String) -> [String] {
        var t = text.lowercased()

        // remove punctuation completely
        let punctuation = CharacterSet.punctuationCharacters
        t = t.components(separatedBy: punctuation).joined()

        // normalize hyphens and dashes → space
        t = t.replacingOccurrences(of: "-", with: " ")

        // normalize multiple spaces
        while t.contains("  ") {
            t = t.replacingOccurrences(of: "  ", with: " ")
        }

        // trim whitespace and newlines
        t = t.trimmingCharacters(in: .whitespacesAndNewlines)

        // split into words
        return t
            .components(separatedBy: .whitespacesAndNewlines)
            .filter { !$0.isEmpty }
    }
Secondly, we define a function that compares the spoken words with the original (target) words. If both are equal, the match increases by 1:
func scoreMatch(target: String, spoken: String) -> Double {
	let targetWords = normalize(text: target)
	let spokenWords = normalize(text: spoken)
	guard !targetWords.isEmpty else { return 0 }

	let count = min(targetWords.count, spokenWords.count)
	var matches = 0

	for i in 0..<count {
		if targetWords[i] == spokenWords[i] {
			matches += 1
		}
	}

	return Double(matches) / Double(targetWords.count)

}
We can now define the score:
func computeScore() {
	let score = scoreMatch(target: poemText, spoken: recognizedText)
	self.matchScore = score
}
We can now update our PracticeView with this functionality:
Button("Stop & Score") {
	viewModel.computeScore()
}
.buttonStyle(.bordered)
Right now recognizedText is always empty, so your score will always be 0 – that’s fine until we hook up speech.
Step 4: Add a SpeechAnalyzerhelper SFSpeechRecognizer wrapper)
Now we add the “engine” that listens and updates recognizedText.
Create SpeechAnalyzer.swift and import the following frameworks:
import Foundation
import Combine
import Speech
import AVFoundation
Create our class SpeechAnalyzer.
@MainActor
final class SpeechAnalyzer: ObservableObject {

}
We add the @MainActor because all methods and property updates in this class happen on the main thread – safe for UI updates.
We use ObservableObject because it allows SwiftUI to observe changes (via @Published).
Within this class we define 3 properties:
isAuthorized: did the user grant speech recognition permission?isListening: – are we currently recording/listening?transcription: the text recognized so far (updated live as the user speaks).
@Published var isAuthorized: Bool = false
@Published var isListening: Bool = false
@Published var transcription: String = ""
Additional properties that drive speech recognition:
audioEngine: low-level audio capture from the microphone.recognizer: the speech recognizer for a specific locale (e.g. “en-US”).request: receives audio buffers and sends them to the recognizer.recognitionTask: represents the running recognition process (with callback).
private let audioEngine = AVAudioEngine()
private var recognizer: SFSpeechRecognizer?
private var request: SFSpeechAudioBufferRecognitionRequest?
private var recognitionTask: SFSpeechRecognitionTask?
You don’t show these directly in the UI – they are implementation details.
We need to initialise the recognizer:
init(locale: Locale = Locale(identifier: "en-US")) {
    recognizer = SFSpeechRecognizer(locale: locale)
}
You can pass a different Locale later if you want to support German, French, etc. SFSpeechRecognizer(locale:) may return nil if the locale is not supported.
Before being able to use the speech recognition, we need to ask the user for permission i.e. we need the authorisation:
func requestAuthorization() async {
    let status = await withCheckedContinuation { continuation in
        SFSpeechRecognizer.requestAuthorization { status in
            continuation.resume(returning: status)
        }
    }
    isAuthorized = (status == .authorized)
}
It returns true if the user granted permission, i.e. if status returns .authorized.
Now, we want to implement the listening functionality – a function startListening.
func startListening() throws {

}
Inside this function, we want
Ensure recognizer is available
guard let recognizer, recognizer.isAvailable else {
	print("Speech recognizer not available.")
	return
}
In case, something was running previously, we stop it (function to be defined soon.)
stopListening()
transcription = ""
Configure the audio session
We are configuring the audio session via AVAudioSession
.record: we’re only recording (not playing sound)..measurement: optimized for speech input..duckOthers: temporarily lowers volume of other apps.setActive(true): makes your app the active audio session.
If any of this fails, startListening() throws and you’ll catch it in the UI.
let audioSession = AVAudioSession.sharedInstance()
try audioSession.setCategory(.record, mode: .measurement, options: .duckOthers)
try audioSession.setActive(true, options: .notifyOthersOnDeactivation)
Create a recognition request
We will feed the audio buffer into SFSpeechAudioBufferRecognitionRequest.
request = SFSpeechAudioBufferRecognitionRequest()
guard let request else { return }
request.shouldReportPartialResults = true
shouldReportPartialResults = true means: “Give us intermediate transcriptions while the user is still speaking.” This lets you update transcription continuously.
Start a recognition task with a callback
let inputNode = audioEngine.inputNode
recognitionTask = recognizer.recognitionTask(with: request) { [weak self] result, error in
	guard let self else { return }

	if let result {
		self.transcription = result.bestTranscription.formattedString
	}

	if error != nil || (result?.isFinal ?? false) {
		self.stopListening()
	}
}
audioEngine.inputNode is the microphone input. recognitionTask runs the actual recognition. The closure is called multiple times with partial results, finally with a “final” result or an error.
Inside the closure:
result.bestTranscription.formattedStringis the current best guess of what was said.- We assign it to self.transcription (which is @Published, so SwiftUI will see it).
- If there’s an error or the result is final (isFinal == true):
- We call stopListening() to clean up everything.
The [weak self] capture ensures we don’t create a strong reference cycle between SpeechAnalyzer and the recognition task.
Connect the microphone to the recognition request
let recordingFormat = inputNode.outputFormat(forBus: 0)
inputNode.removeTap(onBus: 0)
inputNode.installTap(onBus: 0,
				 bufferSize: 1024,
				 format: recordingFormat) { [weak self] buffer, _ in
self?.request?.append(buffer)
}
audioEngine.inputNodeis the microphone input and we ask for its format (outputFormat(forBus: 0)).- We remove any previous tap (cleanup).
- We install a new tap:
- A tap is like tapping into the audio stream.
- For each audio buffer captured, this closure is called.
- We append(buffer) to request, sending it to the speech recognizer.
So this is literally: mic → audioEngine → request → recognizer → text.
Start the audio engine
audioEngine.prepare()
try audioEngine.start()
isListening = true
prepare()pre-allocates needed resources.start()begins pulling audio from the microphone.isListening = truelets the UI know we’re live (e.g. disable “Start” button, enable “Stop & Score” button).
That’s all for the function startListening.
Next, the function stopListening:
func stopListening() {
if audioEngine.isRunning {
	audioEngine.stop()
	audioEngine.inputNode.removeTap(onBus: 0)
}

request?.endAudio()
recognitionTask?.cancel()

recognitionTask = nil
request = nil

isListening = false
}
Step-by-step:
- Stop the audio engine:
- If
audioEngineis running, callstop(). - Remove the tap so we no longer receive buffers.
- If
- End the request & task:
request?.endAudio()signals that no more audio is coming.recognitionTask?.cancel()cancels the task (if still active).
- Clean references:
- Set
recognitionTaskand request tonilso they can be deallocated.
- Set
- Update state:
isListening = falseso the UI can update.
Step 5: Wire SpeechAnalyzer into the view model
Now we want:
- MemorizeViewModel to own a SpeechAnalyzer
- PracticeView to call startListening / stopListening
- Recognized text to flow into viewModel.recognizedText
Update MemorizeViewModel.swift:
Directly after
@Published var matchScore: Double? = nil
add the following:
@Published var isSpeechAuthorized: Bool = false
let speechAnalyzer = SpeechAnalyzer()
private var cancellables = Set<AnyCancellable>()

init() {
    speechAnalyzer.$transcription
        .receive(on: DispatchQueue.main)
        .sink { [weak self] newValue in
            guard let self else { return }

            let trimmed = newValue.trimmingCharacters(in: .whitespacesAndNewlines)
            guard !trimmed.isEmpty else { return }

            let currentTrimmed = self.recognizedText
                .trimmingCharacters(in: .whitespacesAndNewlines)

            if trimmed.count > currentTrimmed.count {
                self.recognizedText = newValue
            }
        }
        .store(in: &cancellables)

    speechAnalyzer.$isAuthorized
        .receive(on: DispatchQueue.main)
        .assign(to: \.isSpeechAuthorized, on: self)
        .store(in: &cancellables)
}
We already added scoring in the extension earlier – keep that code.
In MemorizeMeApp.swift, trigger authorization when the app launches by adding the following task directly after the injection of the .environmentObject(viewModel):
.task {
	await viewModel.speechAnalyzer.requestAuthorization()
}
So authorization happens directly when the app starts.
Step 6: Connect the PracticeView buttons to speech + scoring
Finally, we update `PracticeView.swift to:
- Start/stop listening via
viewModel.speechAnalyzer - Show recognized text (for debugging / optional)
- Call
computeScore()when stopping
Directly after
Text("Poem text is hidden. Recite it from memory!")
	.font(.subheadline)
	.foregroundStyle(.secondary)
	.multilineTextAlignment(.center)
	.padding(.horizontal)
include a text if to ask for authorization of speech recognition and mic:
if !viewModel.isSpeechAuthorized {
	Text("Please enable speech recognition and microphone access in Settings to use Practice mode.")
		.font(.footnote)
		.foregroundStyle(.red)
		.multilineTextAlignment(.center)
		.padding(.horizontal)
}
Replace the ‘listening button’ code by:
Button {
	viewModel.resetPractice()
	do {
		try viewModel.speechAnalyzer.startListening()
	} catch {
		print("Failed to start listening: \(error)")
	}
} label: {
	Label("Start", systemImage: "record.circle")
}
.buttonStyle(.borderedProminent)
.disabled(!viewModel.isSpeechAuthorized || viewModel.speechAnalyzer.isListening)

Button {
	viewModel.speechAnalyzer.stopListening()
	viewModel.computeScore()
} label: {
	Label("Stop & Score", systemImage: "stop.circle")
}
.buttonStyle(.bordered)
.disabled(!viewModel.speechAnalyzer.isListening && viewModel.recognizedText.isEmpty)
Optionally – just before the Spacer() include:
if !viewModel.recognizedText.isEmpty {
	VStack(alignment: .leading, spacing: 8) {
		Text("Recognized Text")
			.font(.caption)
			.foregroundStyle(.secondary)

		ScrollView {
			Text(viewModel.recognizedText)
				.font(.caption)
				.padding(8)
				.frame(maxWidth: .infinity, alignment: .leading)
		}
		.frame(maxHeight: 120)
		.background(.ultraThinMaterial)
		.clipShape(RoundedRectangle(cornerRadius: 12))
	}
	.padding(.top, 8)
}
Congratulations!
You’ve just built a fully functional SwiftUI app powered by Apple’s Speech framework! 🎉
MemorizeMe can listen to your voice, transcribe your recitation in real time, compare it to the original poem, and instantly show a personalized match score — a surprisingly powerful learning tool, all created with clean, modern SwiftUI.
What you have learned
In this code-along, you’ve learned how to:
- Integrate Apple’s SpeechRecognizer to capture spoken words and generate live transcription
- Use a custom scoring algorithm to compare spoken words with the original poem
- Create a smooth two-tab interface for editing and practicing text
- Handle keyboard dismissal inside a TextEditor for a polished editing experience
- Display recognized text and a match score instantly using SwiftUI’s reactive updates
- Allow users to edit or replace the poem and reset it to a default example
You now know how to combine SwiftUI with the Speech framework to build a responsive, interactive learning experience — a foundation you can extend in creative ways, like adding history tracking, streaks, highlight-by-word feedback, or support for multiple languages and poems.
That’s a big accomplishment in a single code-along — very well done! 🎉
That’s a wrap!
Keep learning, keep building, and let your curiosity guide you.
Happy coding! ✨
The important thing is not to stop questioning. Curiosity has its own reason for existence. – Albert Einstein
Download the full project on GitHub: https://github.com/swiftandcurious/MemorizeMe