

HealthSnap is a small app that shows you how your day is unfolding — with a simple snapshot of movement.
All of this data already exists on your iPhone and Apple Watch. HealthSnap doesn’t add anything new — it simply brings today’s essentials together in one calm, readable view.
This tutorial is about learning how to read Health data responsibly, understanding how Apple’s Activity rings are modelled in HealthKit, and building a respectful, Apple-style experience with SwiftUI:
- Read your Move, Exercise, and Stand ring data using HealthKit.
- Learn why some Health values can be summed — and others need to be counted.
- Build a clean permission flow and a snapshot view that updates naturally.
- Understand why Health data sometimes differs between apps — and why that’s okay.
HealthSnap is a first step into HealthKit — small in scope, intentional in design, and focused on clarity rather than comparison.
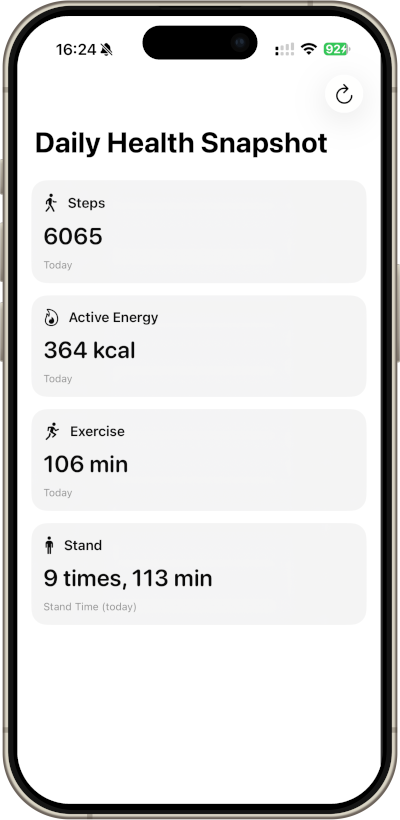
The app will look like this:
Step 0: Set up your project
- Open Xcode: Launch Xcode and select Create a new Xcode project.
- Choose Template: Select App under the iOS tab and click Next.
- Name Your Project: Enter a name for your project, like
HealthSnap.- interface: SwiftUI
- language: Swift
Click Next, and then save your project.
When you open your project, you’ll see the already familiar standard code presenting a globe and the Text “Hello, world!” in the ContentView.swift.
Step 1: Add HealthKit and build the “Connect to Health” screen
Before we read a single number, we need two things:
- your app must be allowed to access Health data (HealthKit capability + privacy text), and
- your UI needs a clean “Connect to Health” entry screen.
Therefore, in this step we’ll focus on setup + a first real screen, without any Health queries yet.
Step 1.1 Allow to Access Health Data
In a first step, you need to enable HealthKit. Please do the following:
- Select your project in the Project Navigator.
- Select your app target (HealthSnap).
- Go to Signing & Capabilities.
- Click + Capability.
- Add HealthKit.
That’s the entitlement your app needs to even talk to HealthKit.
Secondly, to allow access to health data, you need to add the Health privacy text (Info.plist):
Open your target’s Info tab (or Info.plist) and add:
- Privacy – Health Share Usage Description
Key: NSHealthShareUsageDescription
Value (example):HealthSnap reads your Activity data to show a simple snapshot of your Move, Exercise, and Stand rings.
- Note: HealthKit is strict: without this text, your app can’t request access.
Step 1.2 Create the “Connect to Health” UI
Replace the default “Hello, world!” view with a simple connect screen.
Create this in ContentView.swift:
import SwiftUI

struct ContentView: View {
    var body: some View {
        NavigationStack {
            VStack(spacing: 16) {
                Image(systemName: "heart.text.square")
                    .font(.system(size: 44))
                    .padding(.bottom, 6)

                Text("Connect to Health")
                    .font(.title2)
                    .fontWeight(.semibold)

                Text("HealthSnap reads your Activity data to show a simple snapshot of your day. Nothing is written to Health.")
                    .foregroundStyle(.secondary)
                    .multilineTextAlignment(.center)
                    .padding(.horizontal)

                Button {
                    // Step 2: we will request Health access here
                } label: {
                    Text("Allow Health Access")
                        .frame(maxWidth: .infinity)
                }
                .buttonStyle(.borderedProminent)
                .padding(.horizontal)

                Spacer()
            }
            .padding()
            .navigationTitle("Daily Health Snapshot")
        }
    }
}
Run the app — you should now see a clean screen that looks like a real product (even though it doesn’t do anything yet).
Step 2: Request HealthKit Permission
In Step 1 we created the “Connect to Health” screen. Now we’ll make the button actually do something:
- check whether Health data is available
- request read access to the three ring metrics
- show a success/failure message
Step 2.1: Create HealthKitError and HealthKitManager.swift
Add a new Swift file: File → New → File → Swift File. Name it: HealthKitError.swift
In case of health data is not available, we want to present the error description. Therefore we determine the error type in an enum called HealthKitError:
import Foundation
import HealthKit

enum HealthKitError: LocalizedError {
    case healthDataNotAvailable
    case typeNotAvailable(String)

    var errorDescription: String? {
        switch self {
        case .healthDataNotAvailable:
            return "Health data is not available on this device."
        case .typeNotAvailable(let type):
            return "Health data type not available: \(type)"
        }
    }
}
Add a new Swift file: File → New → File → Swift File. Name it: HealthKitManager.swift. HealthKitManager works as a small helper that centralises all HealthKit-related setup we want to show:
HKHealthStoreis the main entry point to HealthKit: All permission requests and queries go through this object.isHealthDataAvailablechecks whether HealthKit is supported on the current device. (For example, HealthKit is not available on iPad simulators or some older devices.)requestAuthorisation()asks the user for read-only access to the Health data we need:- Steps (
stepCount) - Move ring calories (
activeEnergyBurned) - Exercise ring minutes (
appleExerciseTime) - Stand time minutes (
appleStandTime) - Stand ring hours (
appleStandHour)
- Steps (
HealthKit is strict about permissions: you must explicitly declare every data type you want to read. If any of the required types cannot be created, the function throws an error instead of failing silently.
import Foundation
import HealthKit

final class HealthKitManager {
    private let healthStore = HKHealthStore()

    var isHealthDataAvailable: Bool {
        HKHealthStore.isHealthDataAvailable()
    }

    func requestAuthorisation() async throws {
        guard isHealthDataAvailable else {
            throw HealthKitError.healthDataNotAvailable
        }

        guard
            let steps = HKObjectType.quantityType(forIdentifier: .stepCount),
            let energy = HKObjectType.quantityType(forIdentifier: .activeEnergyBurned),
            let exercise = HKObjectType.quantityType(forIdentifier: .appleExerciseTime),
            let standTime = HKObjectType.quantityType(forIdentifier: .appleStandTime),
            let standHour = HKObjectType.categoryType(forIdentifier: .appleStandHour)
        else {
            throw HealthKitError.typeNotAvailable("Could not create one of the HealthKit types.")
        }

        let readTypes: Set<HKObjectType> = [steps, energy, exercise, standTime, standHour]
        try await healthStore.requestAuthorization(toShare: [], read: readTypes)
    }
}
The final call to requestAuthorization(toShare:read:) triggers Apple’s permission dialog, where the user can decide whether to grant access. HealthSnap never writes data back to Health — it only reads what’s already there.
Step 2.2: Add a ViewModel
Create a new Swift file: HealthSnapViewModel.swift that sits between SwiftUI and HealthKit. Its job is to keep HealthKit logic out of the view and expose simple state that the UI can react to.
Because HealthKit calls are asynchronous and affect the UI, the ViewModel is marked with @MainActor. This guarantees that all published changes happen safely on the main thread.
We define some properties that drive the UI:
isLoadingtells the view when to show a progress indicator.errorMessageallows us to display readable errors without crashing.hasHealthAccesscontrols whether the app shows the permission screen or the daily snapshot.
SwiftUI automatically updates the interface whenever one of these values changes:
import Foundation
import HealthKit

@MainActor
final class HealthSnapViewModel: ObservableObject {
    @Published var isLoading = false
    @Published var errorMessage: String?
    @Published var hasHealthAccess = false
}
The ViewModel owns a single instance of HealthKitManager which we call hkm. All HealthKit-related work -permissions and data loading – is delegated to this object.
private let hkm = HealthKitManager(healthStore: HKHealthStore())
This keeps the ViewModel focused on state, not on HealthKit implementation details.
Before attempting any HealthKit access, we check whether the current device supports Health data at all and store it in property canUseHealthKit. This prevents unnecessary errors on unsupported devices or simulators:
var canUseHealthKit: Bool {
	healthKit.isHealthDataAvailable
}
When the main view appears, we immediately attempt to refresh the snapshot. If Health access was already granted earlier, the snapshot loads automatically. If not, the app stays in the permission state. To load the data when the view appears we define a function onAppear:
func onAppear() async {
	await refresh()
}
To request Health data access, we’ll define a function requestAccess:
func requestAccess() async {
	errorMessage = nil
	isLoading = true
	defer { isLoading = false }

	do {
		try await hkm.requestAuthorisation()
		try await loadSnapshot()

		hasHealthAccess = true
	} catch {
		hasHealthAccess = false
		errorMessage = error.localizedDescription
	}

}
What happens here:
- Reset any previous error.
- Show a loading state.
- Ask
HealthKitfor permission. - If successful, immediately load today’s snapshot.
- Update
hasHealthAccessso the UI can switch to the snapshot view.
If anything fails, the error is captured and shown to the user.
Last but not least, to refresh the snapshot, we’ll define a function refresh:
func refresh() async {
	guard canUseHealthKit else {
		hasHealthAccess = false
		errorMessage = "Health data is not available on this device."
		return
	}

	errorMessage = nil
	isLoading = true

	defer { isLoading = false }

	do {
		try await loadSnapshot()
		hasHealthAccess = true
	} catch {
		hasHealthAccess = false
		errorMessage = error.localizedDescription

	}

}
This method reloads Health data without asking for permission again.
- It first checks whether
HealthKitis available. - Then it loads the snapshot.
- If loading succeeds, the app remains in the snapshot view.
- If loading fails, an error message is shown.
This method is used both:
- when the view appears, and
- when the user manually refreshes the snapshot.
By keeping all Health-related state in the ViewModel:
- the SwiftUI views stay simple and declarative,
HealthKitlogic remains testable and reusable,- and asynchronous code is handled in one place.
Step 2.3: Update ContentView.swift to call it
Define a property vm which is an instance of our HealthSnapViewModel:
@StateObject private var vm = HealthSnapViewModel()
In the body of ContentView include just before the Button:
if let message = vm.errorMessage {
	Text(message)
		.font(.footnote)
		.foregroundStyle(.secondary)
		.padding(.top, 4)
		.multilineTextAlignment(.center)
		.padding(.horizontal)
}
Replace the Button with the following:
Button {
	Task { await vm.requestAccess() }
} label: {
	if vm.isLoading {
		ProgressView()
			.frame(maxWidth: .infinity)
	} else {
		Text("Allow Health Access")
			.frame(maxWidth: .infinity)
	}
}
.buttonStyle(.borderedProminent)
.padding(.horizontal)
.disabled(vm.isLoading || !vm.canUseHealthKit)
Step 2.4: Run on a real iPhone (important)
HealthKit permissions and Activity data work best on a real device. When you tap Allow Health Access, you should see Apple’s permission sheet. After allowing, you should see the success message: “Health access granted…”
Step 3: Read Today’s Move Ring Value
Now that HealthSnap can request Health permission, we’ll do the first “real” HealthKit win:
- query today’s Active Energy Burned (that’s the Move ring)
- display it on screen
- keep the UI simple and beginner-friendly
In this step, we’ll only read one metric (Move). Exercise + Stand will come next.
Step 3.1: Add a “fetch today sum” query to HealthKitManager
Open HealthKitManager.swift and add a new function fetchTodaySum below requestAuthorisation():
func fetchTodaySum(_ identifier: HKQuantityTypeIdentifier, unit: HKUnit) async throws -> Double {
    guard let quantityType = HKQuantityType.quantityType(forIdentifier: identifier) else {
        throw HealthKitError.typeNotAvailable(identifier.rawValue)
    }

    let startOfDay = Calendar.current.startOfDay(for: Date())
    let predicate = HKQuery.predicateForSamples(withStart: startOfDay, end: Date(), options: .strictStartDate)

    return try await withCheckedThrowingContinuation { continuation in
        let query = HKStatisticsQuery(
            quantityType: quantityType,
            quantitySamplePredicate: predicate,
            options: .cumulativeSum
        ) { _, statistics, error in
            if let error {
                continuation.resume(throwing: error)
                return
            }

            let sum = statistics?.sumQuantity()?.doubleValue(for: unit) ?? 0
            continuation.resume(returning: sum)
        }

        self.healthStore.execute(query)
    }
}
fetchTodaySum reads the total value for a HealthKit quantity type for today – for example steps, calories, or exercise minutes.
- The function takes a quantity identifier (such as
.activeEnergyBurned) and a unit (such as.kilocalorie()). - It creates a predicate that limits the query to today, starting at midnight.
HKStatisticsQueryis then used with the.cumulativeSumoption to add up all samples for that quantity within the given time range.
Because HealthKit queries are callback-based, the result is wrapped in withCheckedThrowingContinuation so it can be used cleanly with async/await.
If no samples exist yet (for example early in the day), the function simply returns 0.
Why this works for Move and Exercise
Metrics like active energy and exercise time are stored as quantity types in HealthKit.
They represent numbers that can be added together over time — which makes them a perfect fit for a cumulative sum query.
Stand hours work differently, which is why we’ll handle them separately in the next step.
Step 3.2: Extend your ViewModel to load and store the Move value
Open HealthSnapViewModel.swift and update it like this.
First, add a published value for Move calories:
@Published var moveKcal: Int?
This published property holds today’s active energy in kilocalories. Because it’s marked with @Published, SwiftUI will automatically update the UI as soon as the value changes.
To fetch today’s Move value and updating the ViewModel state, we define a function loadMoveRing. Below the requestAccess function add:
func loadMoveRing() async {
        statusMessage = nil
        isLoading = true
        defer { isLoading = false }

        do {
            let kcal = try await healthKit.fetchTodaySum(.activeEnergyBurned, unit: .kilocalorie())
            moveKcal = Int(kcal.rounded())
        } catch {
            statusMessage = "\(error.localizedDescription)"
        }
    }
What happens inside:
- Any previous status message is cleared.
isLoadingis set to true, so the UI can show a progress indicator.- The function calls
fetchTodaySumwith.activeEnergyBurnedto read today’s Move calories. - The result is rounded and stored in
moveKcal. - If anything goes wrong, the error is captured and converted into a user-friendly message.
The defer block guarantees that the loading state is reset, regardless of whether the call succeeds or fails.
Why this step is important
This is the first point where HealthKit data actually appears in your app. By isolating the Move ring logic in a dedicated function:
- the ViewModel stays easy to understand,
- the UI remains free of
HealthKitcode, - and adding Exercise and Stand later becomes a natural extension of the same pattern.
Step 3.3: Update ContentView to show the Move result
Open ContentView.swift. We’ll keep your “Connect” screen, but add a simple “Today’s Move” readout once we have a value.
Just before the Button include this:
if let move = vm.moveKcal {
	VStack(spacing: 6) {
		Text("Move (today)")
			.font(.headline)

		Text("\(move) kcal")
			.font(.system(.title, design: .rounded))
			.fontWeight(.semibold)
	}
	.padding(.top, 8)
}
Step 3.4: Run it (on iPhone)
- Tap Allow Health Access
- Approve permissions
- You should now see a Move (today) number in kcal
Step 4: Add Exercise minutes + Stand hours
At this point you already have the basic flow working:
- a permission screen
HealthKitManagerforHealthKitaccessHealthSnapViewModelthat builds a metrics array for the UI
In Step 4 we’ll finish the ring trio and make sure we’re reading the same ring metrics as Apple’s Fitness app:
- Move: Active Energy (kcal)
- Exercise: Exercise Time (minutes)
- Stand: Stand hours (not minutes)
A key HealthKit idea is the following:
- Some values are quantities you can add up.
- Others are categories you have to interpret (like “stood” vs “idle”).
i.e., Stand hours is not a number you sum. It’s stored as category samples (stood vs idle), so we count stood hours.
Step 4.1: Update HealthKit authorisation
Open HealthKitManager.swift and update your requestAuthorisation() method so it requests access to both:
- the quantity types (Move, Exercise, Steps)
- and the category type for Stand hours
Replace your requestAuthorisation() with this version (it’s clearer + avoids force unwraps):
func requestAuthorisation() async throws {
    guard isHealthDataAvailable else {
        throw HealthKitError.healthDataNotAvailable
    }

    guard
        let steps = HKObjectType.quantityType(forIdentifier: .stepCount),
        let activeEnergy = HKObjectType.quantityType(forIdentifier: .activeEnergyBurned),
        let exerciseTime = HKObjectType.quantityType(forIdentifier: .appleExerciseTime),
        let standTime = HKObjectType.quantityType(forIdentifier: .appleStandTime),
        let standHour = HKObjectType.categoryType(forIdentifier: .appleStandHour)
    else {
        throw HealthKitError.typeNotAvailable("One of the HealthKit types could not be created.")
    }

    let readTypes: Set<HKObjectType> = [steps, activeEnergy, exerciseTime, standTime, standHour]
    try await healthStore.requestAuthorization(toShare: [], read: readTypes)
}
Step 4.2: Add a stand-hours query to HealthKitManager
Open HealthKitManager.swift and add this function below fetchTodaySum(...):
func fetchTodayStandHours() async throws -> Int {
    guard let standHourType = HKObjectType.categoryType(forIdentifier: .appleStandHour) else {
        throw HealthKitError.typeNotAvailable(HKCategoryTypeIdentifier.appleStandHour.rawValue)
    }

    let startOfDay = Calendar.current.startOfDay(for: Date())
    let predicate = HKQuery.predicateForSamples(withStart: startOfDay, end: Date(), options: .strictStartDate)

    return try await withCheckedThrowingContinuation { continuation in
        let query = HKSampleQuery(
            sampleType: standHourType,
            predicate: predicate,
            limit: HKObjectQueryNoLimit,
            sortDescriptors: nil
        ) { _, samples, error in
            if let error {
                continuation.resume(throwing: error)
                return
            }

            let stoodValue = HKCategoryValueAppleStandHour.stood.rawValue

            let hours = (samples as? [HKCategorySample])?
                .filter { $0.value == stoodValue }
                .count ?? 0

            continuation.resume(returning: hours)
        }
        self.healthStore.execute(query)
    }
}
That function returns the number of stood hours today, which matches the Stand ring.
Step 4.3: Create TodaySnapshot to store today’s Health Metrics
Create a new Swift file TodaySnapshot:
import Foundation

struct TodaySnapshot {
    let steps: Double
    let activeEnergyKcal: Double
    let exerciseMinutes: Double
    let standMinutes: Double
    let standHours: Int
}
Step 4.4: Update fetchTodaySnapshot()
Open HealthKitManager.fetchTodaySnapshot() and make sure it loads:
- steps (sum)
- active energy kcal (sum)
- exercise minutes (sum)
- stand minutes (sum)
- stand hours (count)
Replace your fetchTodaySnapshot() with this:
func fetchTodaySnapshot() async throws -> TodaySnapshot {
    async let steps = fetchTodaySum(.stepCount, unit: .count())
    async let activeEnergy = fetchTodaySum(.activeEnergyBurned, unit: .kilocalorie())
    async let exerciseMinutes = fetchTodaySum(.appleExerciseTime, unit: .minute())
    async let standMinutes = fetchTodaySum(.appleStandTime, unit: .minute())
    async let standHours = fetchTodayStandHours()

    return try await TodaySnapshot(
        steps: steps,
        activeEnergyKcal: activeEnergy,
        exerciseMinutes: exerciseMinutes,
        standMinutes: standMinutes,
        standHours: standHours
    )
}
Step 4.5: Create a HealthMetric
import Foundation

struct HealthMetric: Identifiable {
    let id = UUID()
    let title: String
    let valueText: String
    let systemImage: String
    let footnote: String?
}
Step 4.6: Update your ViewModel
Now open HealthSnapViewModel.swift.
Add a new property
@Published var metrics: [HealthMetric] = []
You do have the function loadMoveRing. Replace this function with a new function loadSnapShot:
private func loadSnapshot() async throws {

        let snapshot = try await hkm.fetchTodaySnapshot()

        let stepsValue = Int(snapshot.steps.rounded())
        let activeEnergyValue = Int(snapshot.activeEnergyKcal.rounded())
        let exerciseMinutesValue = Int(snapshot.exerciseMinutes.rounded())
        let standMinutesValue = Int(snapshot.standMinutes.rounded())
        let standHoursValue = Int(snapshot.standHours)

        let stepsMetric = HealthMetric(
            title: "Steps",
            valueText: "\(stepsValue)",
            systemImage: "figure.walk",
            footnote: "Today"
        )

        let activeEnergyMetric = HealthMetric(
            title: "Active Energy",
            valueText: "\(activeEnergyValue) kcal",
            systemImage: "flame",
            footnote: "Today"
        )

        let exerciseMetric = HealthMetric(
            title: "Exercise",
            valueText: "\(exerciseMinutesValue) min",
            systemImage: "figure.run",
            footnote: "Today"
        )

        let standMetric = HealthMetric(
            title: "Stand",
            valueText: "\(standHoursValue) times, \(standMinutesValue) min",
            systemImage: "figure.stand",
            footnote: "Stand Time (today)"
        )

        metrics = [
            stepsMetric,
            activeEnergyMetric,
            exerciseMetric,
            standMetric
        ]
    }
and in the requestAccess function after
try await hkm.requestAuthorisation()
add
try await loadSnapshot()
Step 5: Build the Daily Snapshot UI
In this step you will create:
- a MetricCardView to display one HealthMetric nicely
- A ContentView that switches between:
- “Health not available”
- “Please allow Health access”
- “Daily Snapshot”
- Pull-to-refresh + refresh button
Step 5.1: Create MetricCardView.swift
import SwiftUI

struct MetricCardView: View {
    let metric: HealthMetric

    var body: some View {
        VStack(alignment: .leading, spacing: 10) {
            HStack(spacing: 10) {
                Image(systemName: metric.systemImage)
                    .font(.title3)

                Text(metric.title)
                    .font(.headline)

                Spacer()
            }

            Text(metric.valueText)
                .font(.system(.title, design: .rounded))
                .fontWeight(.semibold)

            if let footnote = metric.footnote {
                Text(footnote)
                    .font(.footnote)
                    .foregroundStyle(.secondary)
            }
        }
        .padding(14)
        .background(.thinMaterial)
        .clipShape(RoundedRectangle(cornerRadius: 18, style: .continuous))
    }
}
Step 5.2: Update ContentView to show the snapshot cards
Update ContentView with the following:
import SwiftUI

struct ContentView: View {
    @StateObject private var vm = HealthSnapViewModel()

    var body: some View {
        NavigationStack {
            Group {
                if !vm.canUseHealthKit {
                    unavailableView
                } else if !vm.hasHealthAccess {
                    permissionView
                } else {
                    snapshotView
                }
            }
            .navigationTitle("Daily Health Snapshot")
            .toolbar {
                ToolbarItem(placement: .topBarTrailing) {
                    Button {
                        Task { await vm.refresh() }
                    } label: {
                        Image(systemName: "arrow.clockwise")
                    }
                    .disabled(vm.isLoading)
                }
            }
        }
        .task { await vm.onAppear() }
    }

    private var snapshotView: some View {
        ScrollView {
            VStack(spacing: 14) {
                if vm.isLoading {
                    ProgressView("Loading Health data…")
                        .frame(maxWidth: .infinity, alignment: .leading)
                }

                if let error = vm.errorMessage {
                    errorBanner(error)
                }

                ForEach(vm.metrics) { metric in
                    MetricCardView(metric: metric)
                }
            }
            .padding()
        }
        .refreshable {
            await vm.refresh()
        }
    }

    private var permissionView: some View {
        VStack(spacing: 16) {
            Image(systemName: "heart.text.square")
                .font(.system(size: 44))
                .padding(.bottom, 6)

            Text("Connect to Health")
                .font(.title2)
                .fontWeight(.semibold)

            Text("HealthSnap reads your Activity data to show a simple overview of your Move, Exercise, and Stand rings.")
                .foregroundStyle(.secondary)
                .multilineTextAlignment(.center)
                .padding(.horizontal)

            if let error = vm.errorMessage {
                errorBanner(error)
                    .padding(.horizontal)
            }

            Button {
                Task { await vm.requestAccess() }
            } label: {
                if vm.isLoading {
                    ProgressView()
                        .frame(maxWidth: .infinity)
                } else {
                    Text("Allow Health Access")
                        .frame(maxWidth: .infinity)
                }
            }
            .buttonStyle(.borderedProminent)
            .padding(.horizontal)

            Spacer()
        }
        .padding()
    }

    private var unavailableView: some View {
        ContentUnavailableView(
            "Health data unavailable",
            systemImage: "exclamationmark.triangle",
            description: Text("This device doesn’t support HealthKit.")
        )
        .padding()
    }

    private func errorBanner(_ message: String) -> some View {
        HStack(alignment: .top, spacing: 10) {
            Image(systemName: "exclamationmark.circle.fill")
            Text(message)
            Spacer()
        }
        .font(.footnote)
        .foregroundStyle(.secondary)
        .padding(12)
        .background(.ultraThinMaterial)
        .clipShape(RoundedRectangle(cornerRadius: 14, style: .continuous))
    }
}
Why your Steps number might differ from Apple’s Fitness app
If you compare HealthSnap’s Steps to the number shown in Apple’s Fitness (or Health) app, you might notice small differences — even though you’re reading the “correct” HealthKit type (stepCount).
That’s normal, and it’s not a bug in your code.
1. Steps can come from multiple sources
HealthKit can store step samples from:
- your iPhone
- your Apple Watch
- and sometimes even third-party apps/devices
When you sum “all step samples today”, you may include steps from multiple sources. Apple’s apps sometimes apply additional rules (like preferring one source, merging, or de-duplicating in a slightly different way).
2. Sync can be delayed (especially from Apple Watch)
Your Watch doesn’t always sync instantly.
Sometimes Fitness updates the total slightly earlier or later than your app – or vice versa – depending on when new samples arrive.
If your steps look “almost right but not identical”, that’s often just syncing.
3. Rounding and aggregation rules differ
Steps are stored as many small samples over time. Depending on how an app aggregates those samples (single sum vs bucketed intervals), totals can differ by a small amount.
HealthSnap uses a straightforward “today’s sum” query, which is simple and reliable — but not guaranteed to match Apple’s UI 1:1 in every scenario.
A practical tip for users
If steps don’t match exactly, try:
- hit the refresh button, or
- wait a minute for your Watch to sync
Congratulations!
You’ve just built an app that shows some Health data! 🎉
What you have learned
By building HealthSnap, you learned how Apple models health data and how to work with it responsibly in SwiftUI.
Along the way, you learned how to:
- Request HealthKit access
You set up the HealthKit capability, added the required privacy text, and built a clear permission flow that respects the user. - Read Activity ring data using the right HealthKit types
- Move → activeEnergyBurned (kcal)
- Exercise → appleExerciseTime (minutes)
- Stand → appleStandHour (category samples)
- Understand the difference between quantity and category data
Some Health values can be summed. Others represent states and must be counted or interpreted — a core HealthKit concept. - Build a daily snapshot using Swift concurrency
You used async/await, parallel queries (async let), and a ViewModel to load Health data cleanly and efficiently. - Design a snapshot UI
Instead of charts or goals, you focused on clarity — a simple overview of today’s movement. - Handle real-world data differences gracefully
You learned why steps may differ slightly between apps and why that’s normal when multiple data sources and sync timing are involved.
HealthSnap is intentionally small — but it’s built on the same principles as much larger HealthKit apps.
From here, you can extend it with trends, explanations, or reflections — or simply keep it as a quiet daily check-in.
That’s a big accomplishment in a single code-along — very well done! 🎉
That’s a wrap!
Keep learning, keep building, and let your curiosity guide you.
Happy coding! ✨
A champion is defined not by their wins, but by how many times they recover when they fall. – Serena Williams
Download the full project on GitHub: https://github.com/swiftandcurious/HealthSnap